Microprobe Procedures Contents
- Operational Layout: Location of Displays and Controllers
- How to focus and stigmate the electron beam image
- Acquiring Images Using the JEOL OS-9 Computer (upper left JEOL monitor)
- Acquiring Images Using Probe for EPMA
Operational Layout: Location of Displays and Controllers
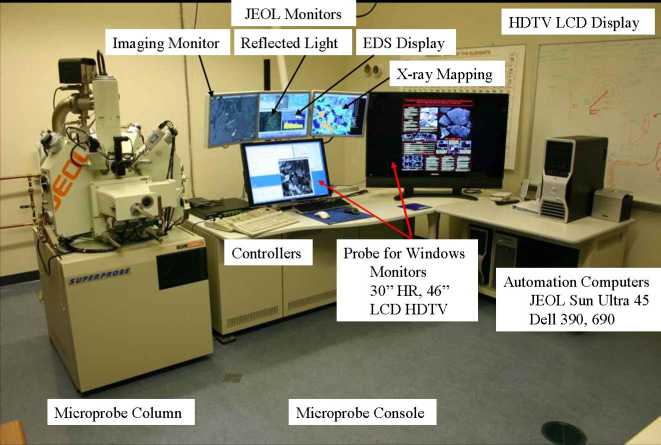
WUSTL JEOL JXA 8200 Superprobe
Guide to monitors and hardware controllers
- JEOL monitors: the upper three monitors are for the JEOL microprobe system.
They are controlled using the left keyboard and left mouse only. - OS-9 monitor is upper left and is used for all electron beam imaging and JEOL photography.
It is controlled only using the left mouse. - The other two upper monitors are used for JEOL software displays:
The central monitor has the JEOL Menu, Present positions, Reflected light monitor, EOS monitor,
and is used for most control of the JEOL software. - The right-side monitor is used for Vacuum and system valve display, Stage Monitor, and JEOL EDS display.
- Probe for EPMA monitors: the two large monitors are used by the Probe for EPMA operating system.
The right hand keyboard and mouse are used for these two monitors only. - The left monitor is used for the Probe for EPMA software. It has the PFE log window, Acquire, Automate, and Analyze windows.
- The right monitor (large LCD HD TV) is used for PFE Picturesnap display of stage-calibrated images.
- JEOL Hardware controllers
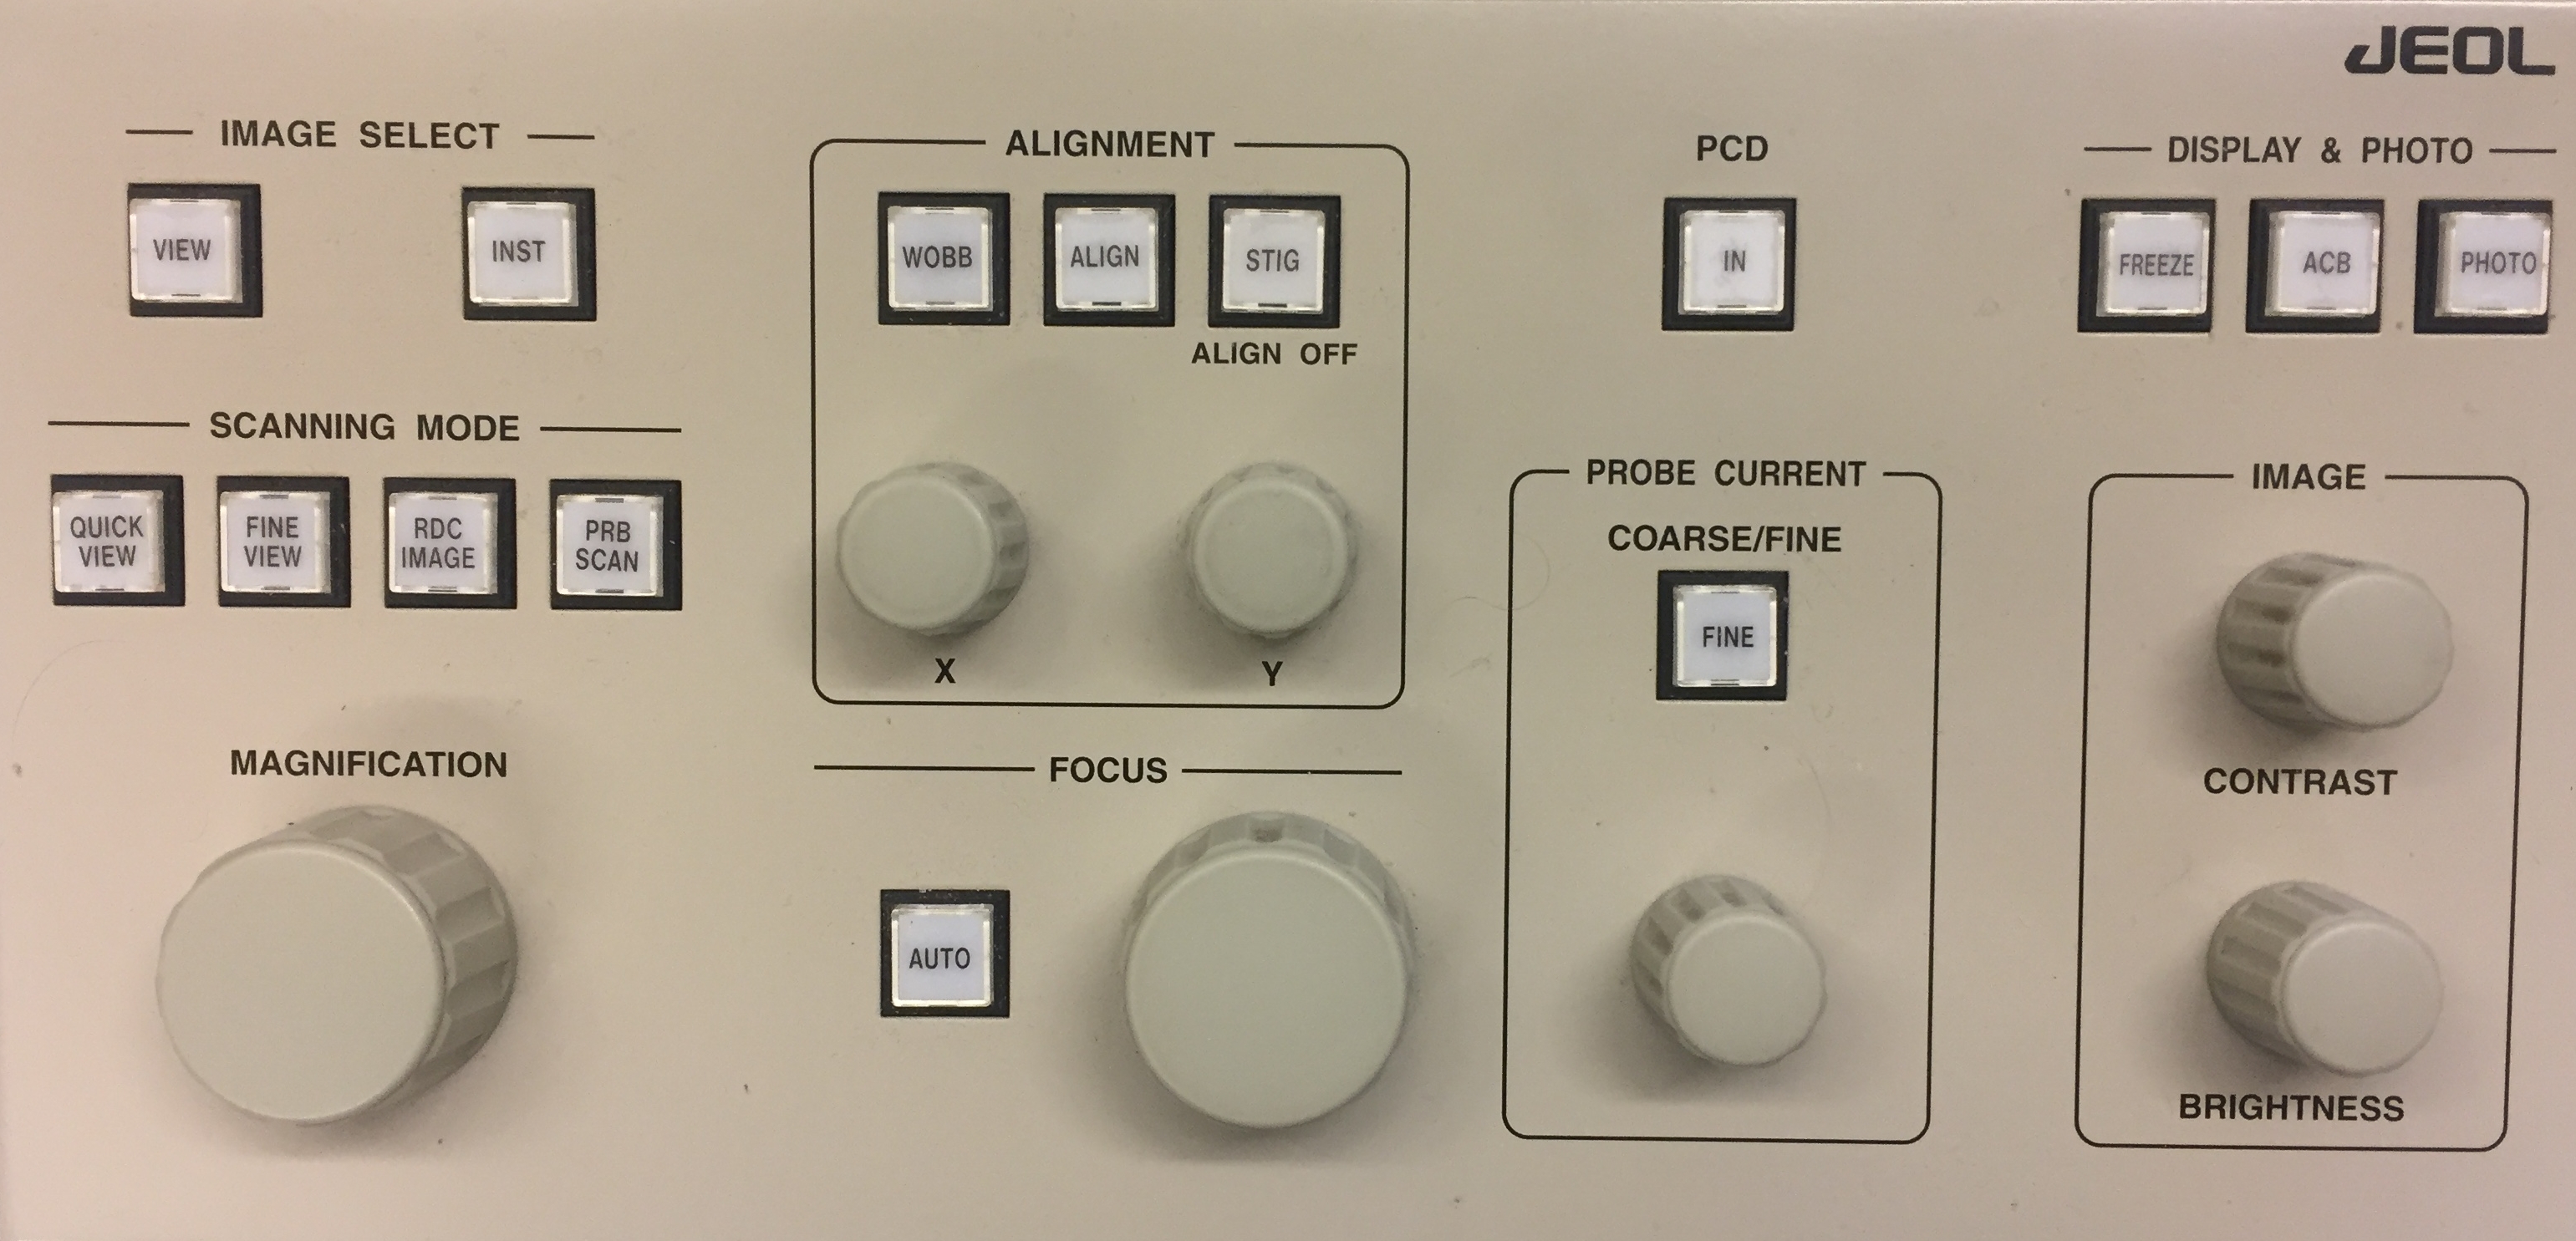
- JEOL Hardware controller: the left controller is used for scan mode and speed, scan format, adjustment of magnification,
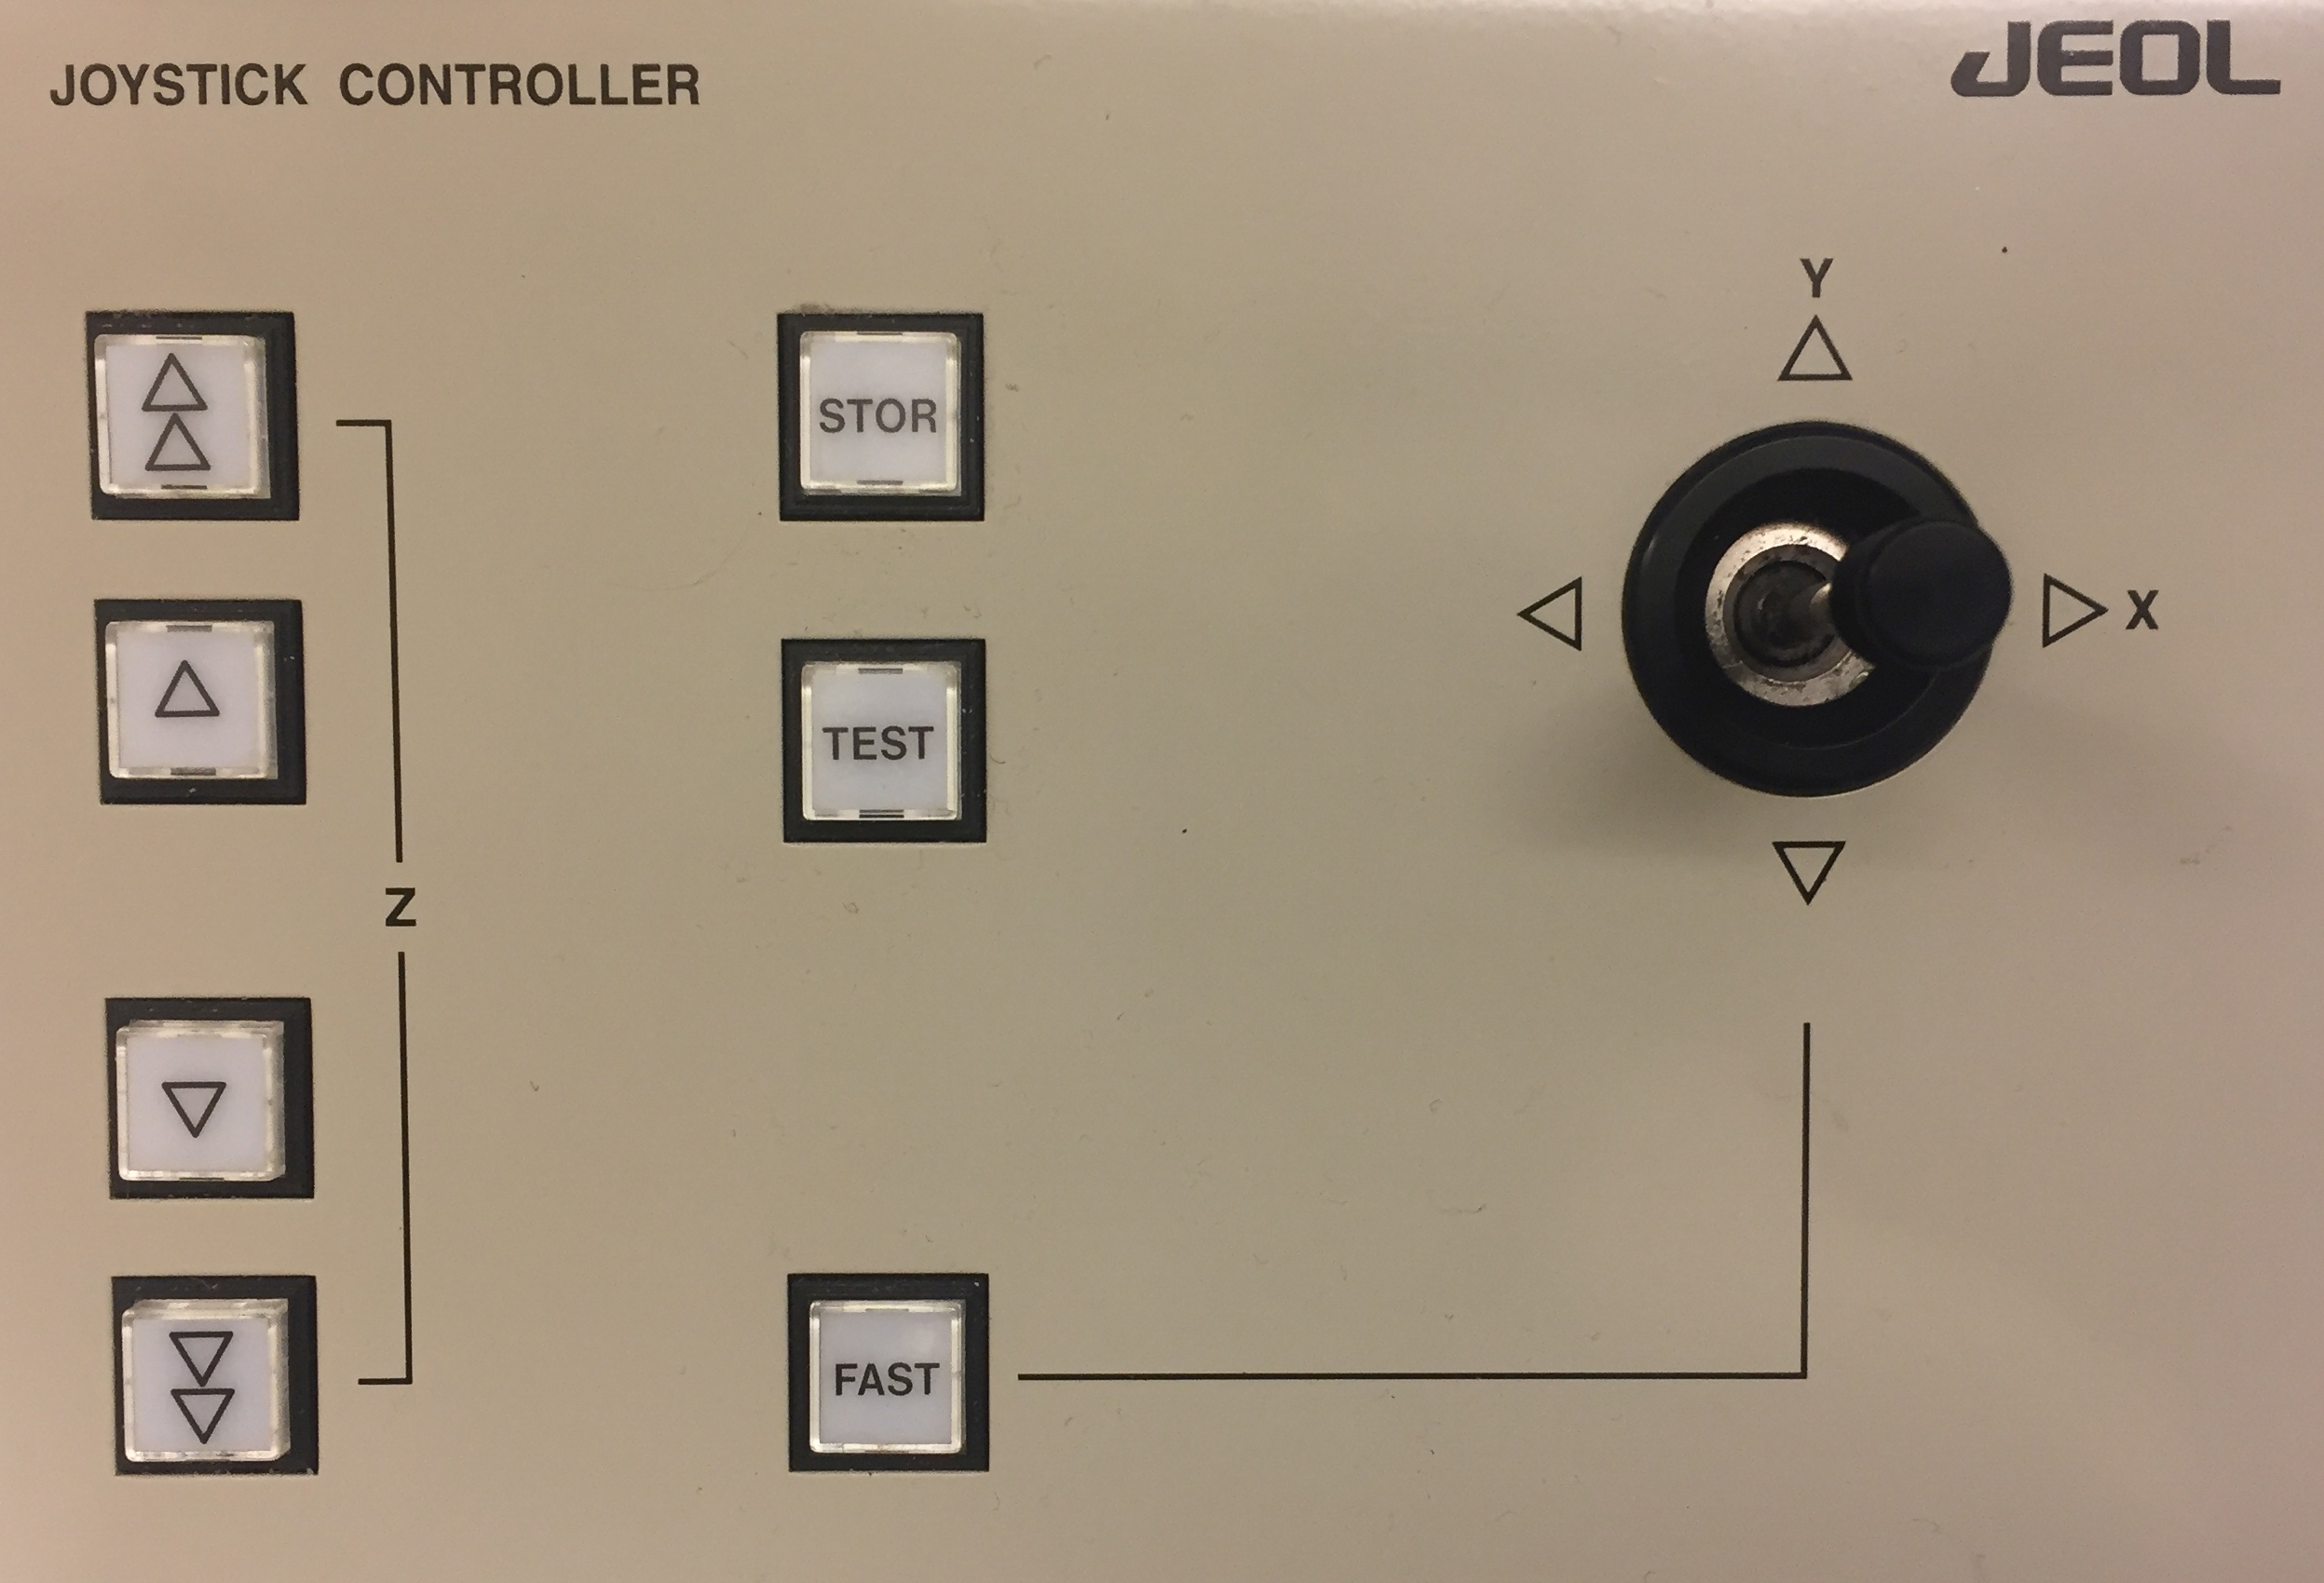
focus and stigmation, adjustment of brightness and contrast, and OS-9 image photography. - JEOL Joystick controller: used for moving the sample (move joystick for constant velocity and in the direction the sample is desired to move),
and for Z-axis optical focus of the sample. Use the coarse and fine Z-axis buttons to move the sample up and down in order
to optically focus for WDS analysis. - Method for Setting Image Focus and Stigmation
- Set the microprobe to imaging mode, OS-9 monitor, rectangular icon at top.
- Position the sample using the JEOL Joystick Contoller. JEOL Joystick controller:
- Locate a feature on the sample with cracks in the x and y diagonal directions
or boundaries that have sharp intersections. - Set sample optical focus using the JEOL joystick controller with the reflected light on.
- The secondary electron imaging in rapid scan and reduced area scan is used for focusing:
Set imaging to SEI (OS-9 pop-up menu at bottom). - On the JEOL Hardware Controller: JEOL Hardware controller:
- Set imaging scan speed to rapid using Quick View on left side of JEOL hardware controller.
- Set imaging to reduced scan using RDC Image button on JEOL hardware controller.
- Set contrast and brightness on right side of JEOL hardware controller to optimize image.
- Set magnification to high enough in order to clearly see effect of focus knob.
If you set too high mag you will not be able to focus, and if you set too low you will
not be able to see effect of focus. - Set focus to optimum setting by adjusting counterclockwise and clockwise for best focus.
- If image is distoring in the diagonal directions as you go through focus, the stigmators must be adjusted.
- Adjust stigmation: In Alignment controls on JEOL hardware controller, make sure Align button has been pressed and illuminated.
- Adjust X and Y stigmators individually by rotating each knob counterclockwise then clockwise to produce sharpest image.
If you turn the knobs too far you will cause major miscorretion of the imaging. - Best focus is achieved with minimal image distortion in diagonal directions with no image shift as you go from
under focus to over focus with the focus knob. - Set imaging mode back to full screen by clicking Quick View button on hardware controller:
The fast and slow scan speeds are toggled by clicking the Quick View button repeatedly. - Set the image signal back to backscattered electron by selecting COMPO on the OS-9 pop-up menu at the bottom of the screen.
- Image Photography Using the JEOL OS-9 Monitor
- Select the desired scanning signal using the pop-up menu at the bottom of the JEOL OS-9 monitor.
- Set the magnification to the value needed and frame the sample position as desired.
- Set the scan speed to the slower rate by pressing Quick View on the JEOL hardware controller.
- Turn off the reflected light using the OM Monitor window on the JEOL center monitor, clicking on the light bulb icon.
- Adjust the brightness and contrast using the knobs on the right side of the JEOL hardware controller.
- Press the Photo button on the top right of the JEOL hardware controller to take the photo.
- Wait for Photographing… progress bar to finish.
- When the photo pass is finished, the OS-9 computer will put the image in Freeze mode. You will need to press
the Freeze button to return to live scanning. - The image will be transferred to the microprobe computer and copied to the Incoming Images folder.
You should edit the name of the image from "imageXXX.bmp" to "Sample name Image signal Mag imageXXX.bmp"
For example "Fragment 3 BSE 60X image005.bmp". This retains the image numbering and has the info in the image file name. - Turn the reflected light back on and adjust the brightness and contrast to continue working.
- Image Photography Using Probe for EPMA Digitize Image
- Select the desired scanning signal using the pop-up menu at the bottom of the JEOL OS-9 monitor.
- Set the magnification to the value needed and frame the sample position as desired.
- Set the scan speed to the slower rate by pressing Quick View on the JEOL hardware controller.
- Turn off the reflected light using the OM Monitor window on the JEOL center monitor, clicking on the light bulb icon.
- Adjust the brightness and contrast using the knobs on the right side of the JEOL hardware controller.
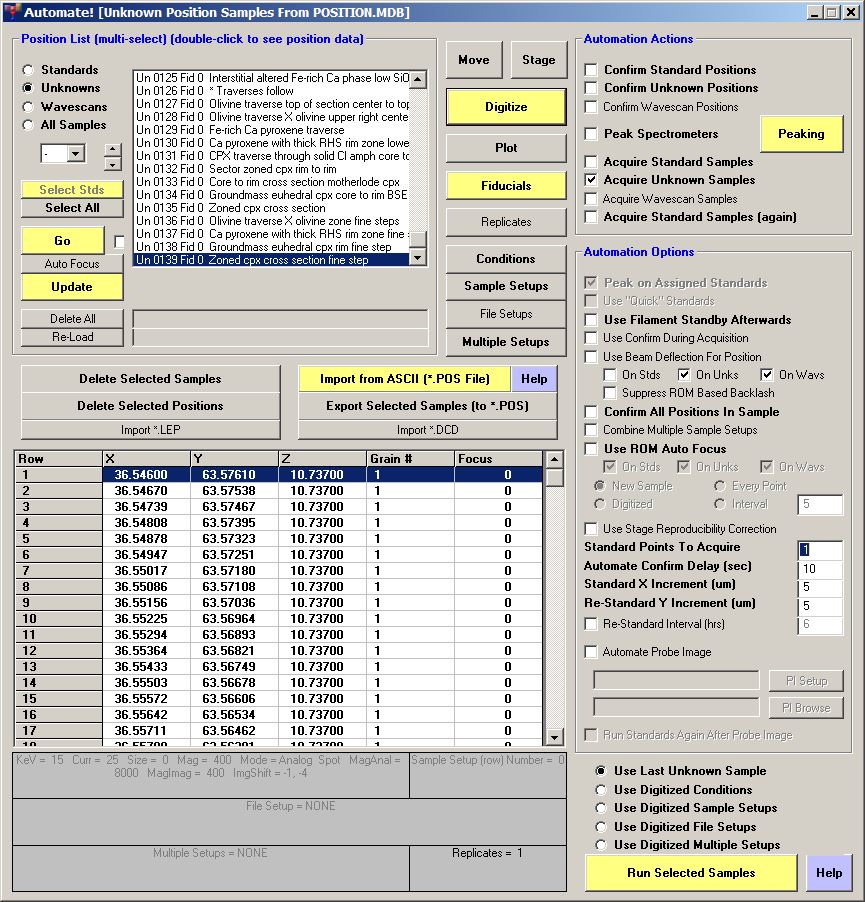
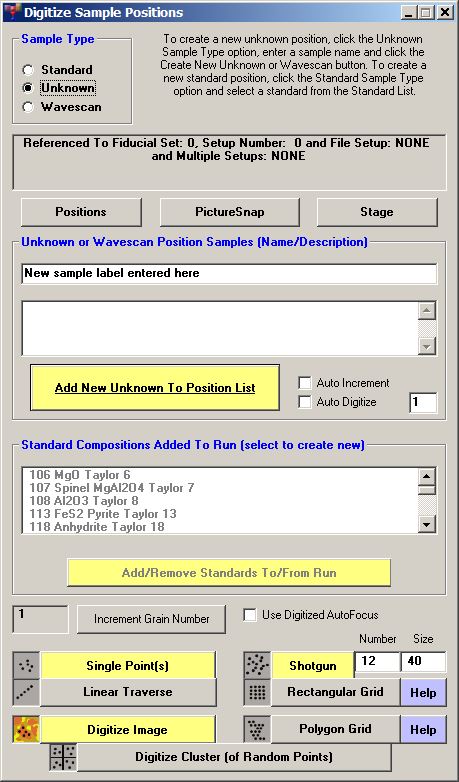
- In the PFE software Automate window, click on the Digitize button to open the Digitize Sample Positions window.
- Enter a new sample label in the Unknown or Wavescan Position Samples field (this sample will not be used for anything).
- Click the Add New Unknown to Position List button to add this new sample to the Automate sample list.
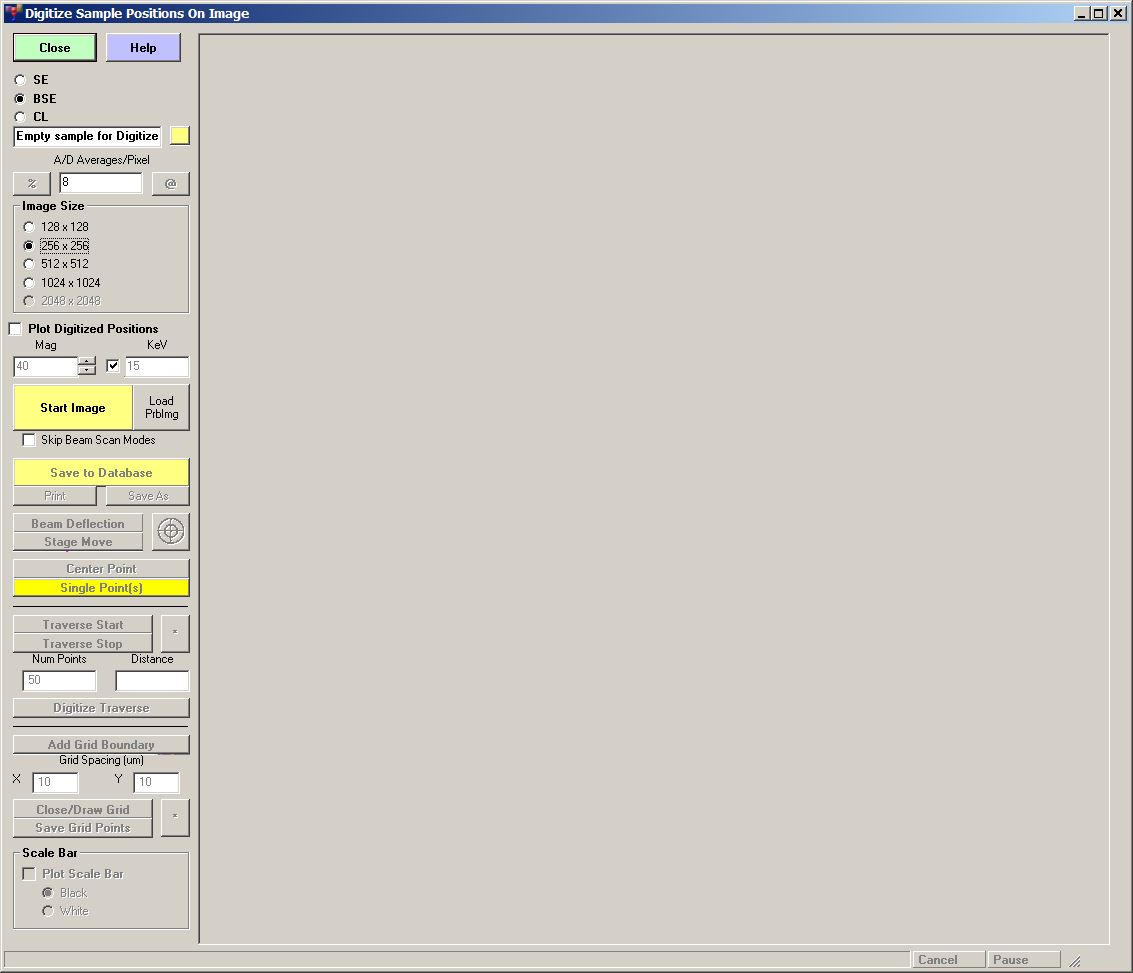
- Click on the Digitize Image button at the bottom of the Digitize Sample Positions window.
This opens the Digitize Sample Positions on Image window: - Now select the image signal type to agree with the signal being displayed on the OS-9 monitor.
If you do not select the correct image signal, it will acquire the wrong signal.
Choose either SEI,BSE, or CL. - Adjust the brightness and contrast on the JEOL Hardware controller for the optimum image.
- To acquire a test image, set the Image Size button to either 128 or 256 in order to rapidly acquire an image.
- Acquire the image by clicking on Start Image. The progess will be shown on the bottom info line of the window.
- If the image has the correct brightness and contrast, set the Image Size to 1024, and click on Start Image.
For all dialogs that ask if you want to save the current image to the database, click on No. - When the full resolution image has been acquired, click on Save As (Do not click on Save to Database).
You should name the image in the format Sample Signal Magnification, such as "Sample 1A BSE 50X.bmp".
Save the image to your Images folder in your PFE run. - You can continue to acquire images and save them from this window and you do not have to generate a new
sample for each image. - When you are done acquiring images, click on the Close button and again click on No when asked about saving
to the database. - Don't forget to turn the reflected light back on if you are doing analyses.
How to focus and stigmate the electron beam image
These methods are for setting electron beam focus and stigmation and should only be done when operating
the instrument at probe current at or below 25nA.
It is assumed that you are doing backscattered-electron imaging of a polished and flat sample.
You will need to confirm the image is focused and stigmated before you acquire a digital photograph.
You will use the JEOL OS-9 monitor (upper left) and JEOL hardware controller.
Acquiring Images Using the JEOL OS-9 Computer
To take a digital photograph, you will need to select the location using the joystick, make sure the sample
is in optical focus, confirm that the electron beam scanning image is focused and stigmated using the instructions
for focusing and stigmating in the above section.
Acquiring Images Using Probe for EPMA
The PFE software allows you to acquire digital images in the same way as the JEOL OS-9 computer, but has the advantage of saving
a stage-calibrated image which can be used to digitize sample positions. These instructions cover how to acquire the image
save it, and load it into Picturesnap for use. You should again perform focus and stigmation as necessary.
Automate window:
Digitize Sample Positions window:
Digitize Sample Positions on Image window:
Page last updated on: by Paul Carpenter