On JEOL Monitor 2, EPMA Main Menu, Monitor Menu, Select Vacuum Monitor.
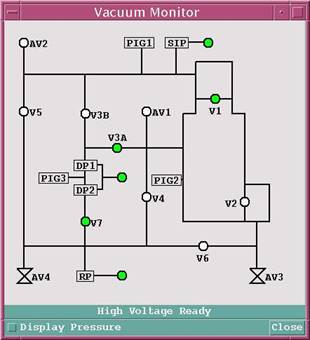
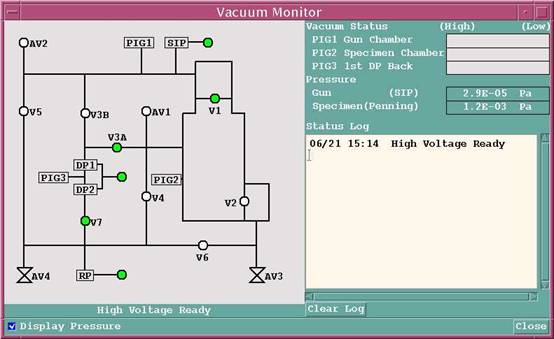
On Vacuum Monitor window check Display Pressure checkbox.
Confirm that the microprobe is at high vacuum (these images captured at high vacuum) and that the vacuum level is in normal operating range.
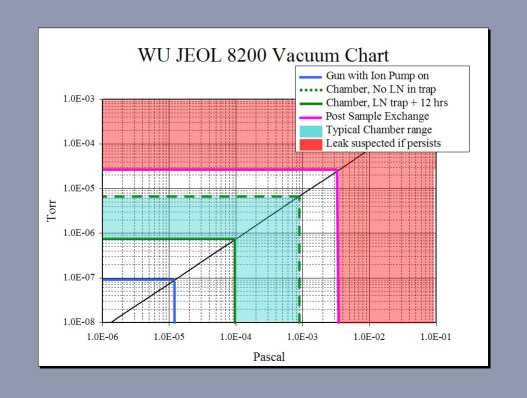
If you have not done so, read Vacuum Condition information. Gun should be at ~10-5 Pascals
Specimen chamber should be at or below 10-2 Pascals.
If the vacuum is in the normal vacuum range, proceed with sample exchange
procedure.
Sample Exchange
Sample must be positioned at the correct stage position for sample exchange. Incorrect position of stage during sample exchange will result in damage to the stage assembly!
Stage Positioning
On JEOL Monitor 2, EPMA Main Menu, Monitor Menu, Select Stage Monitor.
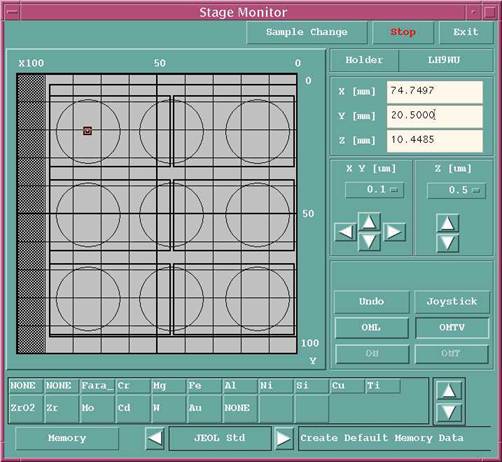
On Stage Monitor, click on Sample Change button.
Stage: Sample Change confirmation dialog will appear with sample exchange coordinates (X 45mm, Y 1 mm, Z 11 mm). Click on OK button to proceed to exchange position.
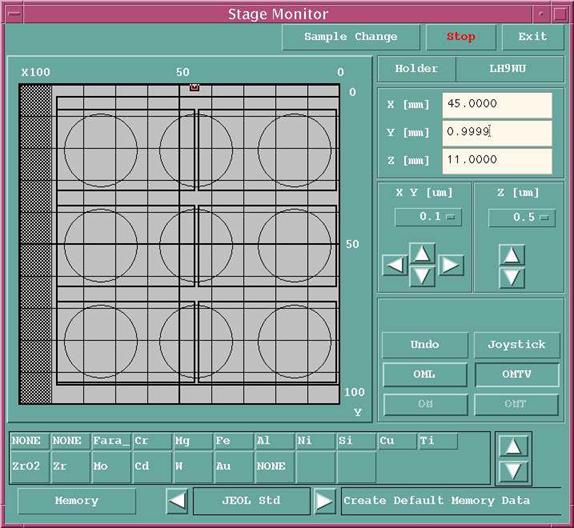
The stage will drive to the exchange position and will stop. The exchange position looks like this on the Stage Monitor (the current position is X 45, Y 1, Z 11 and the position marker is at the top center of the stage graphic next to the 50):
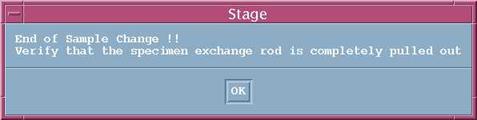
The program will also display the following dialog which you should click only after completing the sample exchange procedure. This is to keep from moving the stage until the exchange rod is completely withdrawn from the instrument:
Pump-down of Sample Exchange Chamber and Sample Exchange: Insertion
Confirm that there is no sample currently in the microprobe: If the exchange rod is oriented to the left then there is not a sample in the microprobe. If the exchange rod is oriented to the right then there is a sample in the microprobe.
Wearing gloves, put your samples in the stage holder assembly, using Cu tape to ground the samples.
Take a picture of the entire block or whatever portion will be used for PictureSnap imaging.
Verify that the button on the gate valve assembly is illuminated (green). This indicates that the sample exchange chamber has been vented and the instrument is not pumping on the exchange chamber.
Open the sample chamber door and place the sample block on the platform.
Close the sample chamber door and lock with the clamp.
Start pumping on the sample exchange chamber by pressing the button. It will take about 2 minutes for the light to go out. When the light goes out you may proceed.
Slowly rotate the exchange rod handle from the down position up/clockwise to horizontal take about 10-15 seconds to do this. This step vents the sample exchange chamber to the interior of the microprobe.
Now pull the gate valve rod out to the right, all the way, and then rotate counter-clockwise until the rod points down at about a 45 degree angle. This locks the gate valve in the open position and keeps the valve from closing during the exchange procedure.
Slowly insert the sample block into the instrument while looking through the circular window. You must go slowly as the sample block jitters on the way in.
Push the rod all the way in to the instrument, then turn clockwise to disengage the sample block. Now pull the rod all the way out.
Close the gate valve by rotating the gate valve rod clockwise to horizontal, then push the rod in towards the left. When it is all the way in, rotate the handle to the vertical down position. You are not done yet!!
Push the green button to vent the sample exchange chamber. You will hear a hissing sound as the sample exchange chamber vents.
You should now click on the stage Ok button to complete the software stage move action.
On JEOL Monitor 2, EPMA Main Menu, Monitor Menu, Select Vacuum Monitor.
On Vacuum Monitor window check Display Pressure checkbox.
Confirm that the microprobe is at high vacuum (these images captured at high vacuum) and that the vacuum level is in normal operating range.
If you have not done so, read Vacuum Condition information. Gun should be at ~10-5 Pascals
Specimen chamber should be at or below 10-2 Pascals.
If the vacuum is in the normal vacuum range, proceed with sample exchange
procedure.
Sample Exchange
Sample must be positioned at the correct stage position for sample exchange. Incorrect position of stage during sample exchange will result in damage to the stage assembly!
Stage Positioning
On JEOL Monitor 2, EPMA Main Menu, Monitor Menu, Select Stage Monitor.
On Stage Monitor, click on Sample Change button.
Stage: Sample Change confirmation dialog will appear with sample exchange coordinates (X 45mm, Y 1 mm, Z 11 mm). Click on OK button to proceed to exchange position.
The stage will drive to the exchange position and will stop. The exchange position looks like this on the Stage Monitor (the current position is X 45, Y 1, Z 11 and the position marker is at the top center of the stage graphic next to the 50):
The program will also display the following dialog which you should click only after completing the sample exchange procedure. This is to keep from moving the stage until the exchange rod is completely withdrawn from the instrument:
Pump-down of Sample Exchange Chamber and Sample Exchange: Removal
Verify that the sample chamber door is closed and clamped.
Verify that the button on the gate valve assembly is illuminated (green). This indicates that the sample exchange chamber has been vented and the instrument is not pumping on the exchange chamber.
Start pumping on the sample exchange chamber by pressing the button. It will take about 2 minutes for the light to go out. When the light goes out you may proceed.
Slowly rotate the exchange rod handle from the down position up/clockwise to horizontal take about 10-15 seconds to do this. This step vents the sample exchange chamber to the interior of the microprobe.
Now pull the rod out to the right, all the way, and then rotate counter-clockwise until the rod points down at about a 45 degree angle. This locks the gate valve in the open position and keeps the valve from closing during the exchange procedure.
Slowly insert the exchange rod into the instrument while looking through the circular window. Make sure that the sample block is aligned at the correct exchange position. If you do not something is wrong and you should stop at this point, close the gate valve and vent it, and get help.
Push the rod all the way in to the instrument, then turn counter-clockwise to engage the sample block. Now pull the rod all the way out.
Close the gate valve by rotating the gate valve rod clockwise to horizontal, then push the rod in towards the left. When it is all the way in, rotate the handle to the vertical down position. You are not done yet!!
Push the green button to vent the sample exchange chamber. You will hear a hissing sound as the sample exchange chamber is vented.
After venting, you may open the sample exchange chamber by releasing the clamp.
The exchange rod can be used to gently push to the right, this will open the chamber and presents the sample.
Wearing gloves, you can pick up the sample block vertically.
Close the sample exchange chamber and secure with the clamp.
Now you can click on the OK button on the Stage dialog box shown above, to indicate that you are done with sample exchange.